Paper flower backdrops are elegant and stunning, and actually very easy and inexpensive to make. If you want to make a paper flower backdrop for an upcoming event, this series of tutorials is exactly what you need.

So you want to know how to make this gorgeous DIY paper flower backdrop from the Secret Garden baby shower? This tutorial will show you exactly how to make those giant paper flowers and put it all together to make a stunning photo backdrop.
It's easy! Inexpensive (under $20)! And a really stunning, large scale piece of decor, of course.
.jpg "Paper flower backdrop")
I'm going to break this down into several posts. Not because it's complicated, but because I made quite a few different types of paper flowers. It's too much to cram into one post.

I was inspired by Chanel's 2009 spring runway show, and the absolutely striking paper flower backdrop. To make your very own, you only need a very few simple materials.
You'll need one roll of easel paper (like for kids to draw on).

Now let's get started!
How to Make A Basic Giant Paper Flower
This is a sort of generic any-flower. I wasn't trying to replicate anything in real life. I'm talking about the flower on the backdrop that looks like this:

First cut three or so circles of paper in graduated sizes.
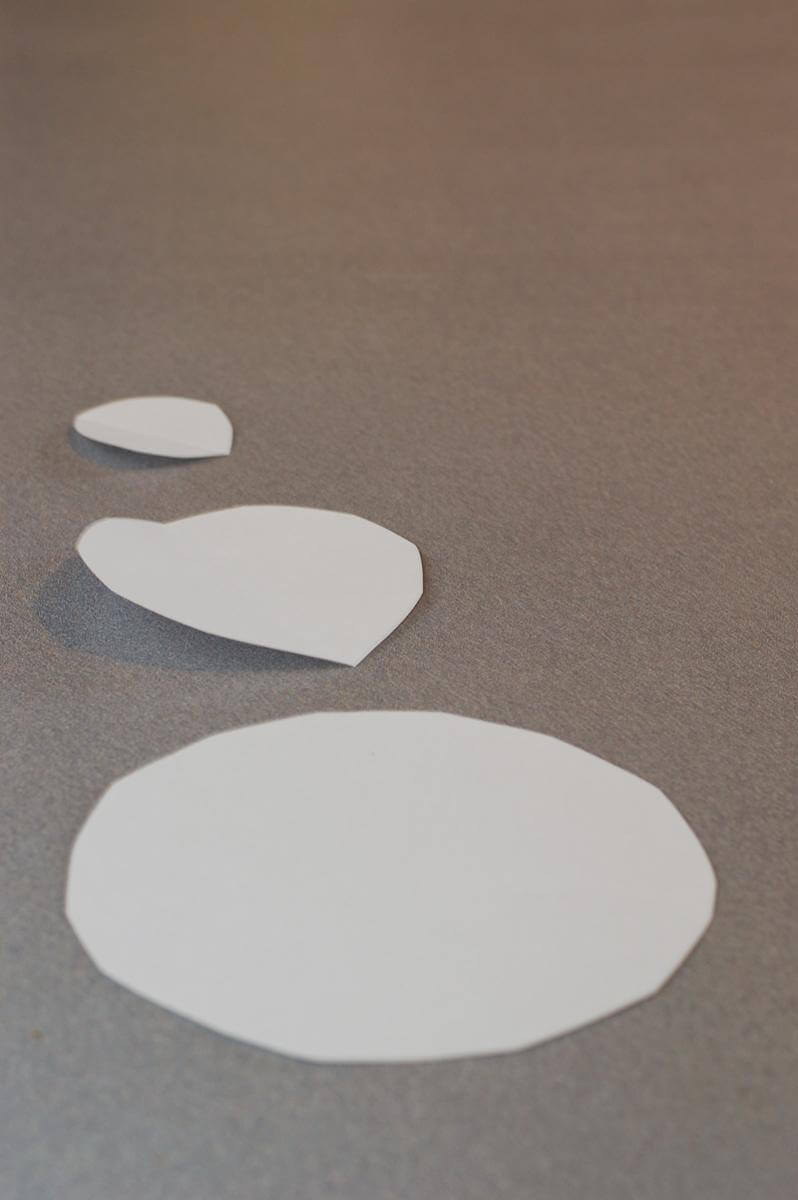
Then cut them into petal shapes. Four petals, five petals, six petals, it doesn't really matter.

Simply use a dab of hot glue to nest the petals together. Curl the petals inward slightly, if desired.
Make a simple center by cutting a narrow strip of paper, cutting it into a fringe, and rolling it up.

Glue that in the middle of your flower, and you're done!
How to Make a Pom Paper Flower
You'll notice some similarities in technique here, but you end up with a dramatically different effect. I'm talking about the ones that look like this:

First, cut two or three graduated circles of paper. Then cut the circles into a fringe. Cut almost, but not quite all the way to the center.

Then, simply stack the fringed circles, starting with the largest on the bottom, and glue together with a hot glue gun. Finally, pinch the flower from the back. Just scrunch it. Don't worry about not doing it right--I promise it will work.

Ta-da! Pom flower.
I want to make one very important comment about these flowers. Don't worry about perfection! Go back and look at my photos. Notice how wonky the circles are, how the petals are nowhere near symmetrical. It's ok! This is not about the perfection of a single flower, but rather about the power of a mass of them. Nobody will notice those imperfections, I swear, and that's the key to making this an easy project. If you obsess about getting everything just right, you'll drive yourself insane.
Paper Flower Backdrop:
Head to Part 2 and Part 3 to get the rest of the tutorial.


Or do you love this look, but just aren't a crafty person? You can buy paper flower installations (like this one you can buy here).
Or if this is going to be for a photo backdrop, you can buy a vinyl photo backdrop that just looks like a paper flower wall! (buy it here) So affordable, too!

.png)