I've adored pop up books as far back as I can remember. Any kind of paper craft, really, but I have have a particular affection for pop ups. How amazing, how perfectly magical to be able to take a flat piece of paper and with a little glue and a pair of scissors, turn it into an amazing, three dimensional work of art. So cool.
(1).JPG)
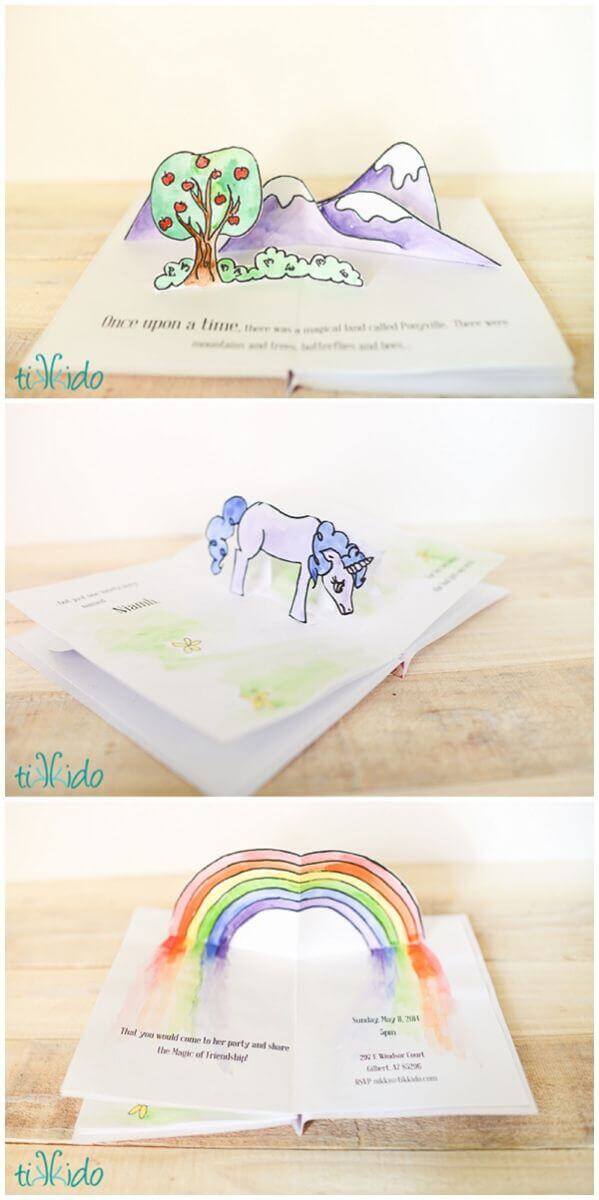
When my youngest daughter decided that she simply HAD to have a My Little Pony birthday party this year, I decided to make a super simple little pop up book as the invitation. Seriously. I only used two techniques, and they're the EASIEST, most basic pop up techniques ever. Anyone can do them. But it looks so cool and impressive, right?
Basic V Fold Pop Up Technique:
- cardstock
- scissors
- glue (glue gun or UHU glue stick)
.jpg)
Cut a piece of cardstock in the shape you want to pop up from the paper. Fold the paper in half (I'm showing a symmetrical shape here, but it doesn't have to be. Just remember that wherever you fold, that will line up with the center fold of the card.
Lightly score and fold to create a small foot for your pop up. That's the part that will get glued to the card.
.JPG)
I used a standard sized printer sheet of cardstock as my base card. Folded in half, it's a fabulous size for a card or invitation.
In the photo above, you can see that I've folded back the foot of the blue paper that will pop up from the manilla paper. I've also cut out a little notch at the center, so that when I glue the blue pop up to the card base, my foot won't overlap the fold in the base and make things bulky and hard to close.
.jpg)
Line up the fold of your pop up piece with the fold of the base card. Figure out where you want to glue down the pop up, and trace lightly with a pencil to mark the spot. I used a black sharpie so you could see it easily, but if you use a pencil, you won't see anything once the paper is glued in place. It's pretty obvious to see why this basic technique is called a V Fold Pop Up.
.JPG)
Here's a view from the back side of the pop up, where you can see exactly why we notched out a bit of the foot earlier.
Glue it down, using your penciled guide lines to help you place the pop up, and voila, you've made a pop up card! This one technique is really all you need to make an awesome pop up card or book.
.JPG)
Making a pop up book is nothing more than making three easy cards and gluing them together. First I start by sketching out my concept.
.JPG)
Then, using any random scrap paper or cardstock, I make a proof of concept trial run. Then it's time for the real thing.
.JPG)
Because I was making quite a few of these, I didn't want to have to hand draw each one, so I created an illustrator file with all the elements. And lucky you, I'm offering them for free download so you can use any of the elements for your own pop up cards!
Free Printable Pop Up Card Elements:
And here are the Open Office files properly formatted with the text for the invitation (I've removed my personal information--just type yours right in):
.JPG)
I don't have a color printer, so these are just black and white line drawings. I used watercolors to add color quickly (and I had fun with the rainbow, painting the colors bleeding out on the base card. I think just this would make a lovely invitation, get well card, birthday card... it's good for pretty much anything! Who wouldn't smile upon seeing a pretty pop up rainbow emerge from a card?
.JPG)
The only spread that used a slightly different technique (still super simple) was the one with the sad unicorn. Print out the unicorn, and fold in the center (at the pony's back). Cut excess paper away, leaving little tabs under the feet (just like we did for the "feet" of the pop ups in the earlier technique). Glue the feet down on either side of the center fold of the base card. Your pony will stand to sad attention as soon as the page is opened.
.JPG)
Glue the pop up spreads together (you'll end up with double-thicknesses between each spread, just like a real pop up book). Then add a cover, and you're done!
The covers were made very easily by gluing pretty scrapbook paper to the outside of the glued-together pop up spreads.
.JPG)
A little twine, a pretty tag, and a silk flower made the invitation extra special.
Insanely simple techniques are really all you need to make an amazing pop up card.
Looking for great instruction and lots of other techniques? Here's one of my favorite pop up instruction books.

.png)