I'm building on the techniques I showed in the Danielle hairpin and Crystal Hairpin tutorials, showing how you can combine these elements to create absolutely gorgeous hair accessories that look like they've just been featured in a swank wedding magazine. I can say this with all earnestness, because I created these designs for my old business, and they were featured in fabulous print magazines, blogs, and worn by brides all around the world. ;-)
.jpg)
I originally started my tiara business back in 2000, because I didn't want to pay $535 for a tiara for my own wedding. If you have a little time and patience, you really can create gorgeous wedding accessories (using much higher quality materials than typically found in most bridal accessories), and save a ton of money.
Materials and Equipment for Making Elegant Swarovski and Pearl Carin Hairpins
.JPG)
- metal hairpins
- 28 or 26 gage wire
- tiny genuine seed pearls (2-3mm size)
- 4mm 5301 Swarovski bicone crystals
- Swarovski foil-backed navette stone, 6x3mm size, item #4228
- Swarovski crystal flower button, item #60441
- glue
- wire cutter, needle nose pliers, and flat nosed pliers
(1).JPG)
The first step is to make Swarovski marquise shaped rhinestone tri-clusters. See the Danielle Hairpins tutorial for all the details. You'll need two tri-clusters for each Carin hairpin.
.JPG)
Wire each two tri-clusters to the top bend of a metal hairpin. Remember to wrap the wire around the hairpin three times (read the Swarovski crystal hairpins tutorial for the reason why). Trim off any excess wire, and use the flat nosed pliers (the "squishers") to flatten down any metal ends sticking up.
.JPG)
Next, it's time to add the sprigs with the 4mm Swarovski crystal bicones. You could do this the same way we did the rhinestone tri-clusters, but you'd end up with a lot more bulky wire. I recommend cutting a long length of wire (about two feet), wiring one end to the top bend of the hairpin, and creating the crystal sprigs directly on the hairpin, as shown above. Make three sprigs: two with two crystals, one with one crystal.
.JPG)
use the same wire we used to make the crystal sprigs to add the tiny seed pearl "berries" to the rhinestone tri-clusters. Now do you see why we use such a long piece of wire?
Once you've finished the crystal sprigs, wind the wire along the twisted wire of the rhinestone tri-cluster. When you reach the bottom leaf, add a pearl to the wire strand, and continue wrapping. Add a second pearl below the top rhinestone on the tri-cluster. Then wind the wire strand all the way back down the stem of the tri-cluster and repeat on the other side (the second rhinestone tri-cluster).
.JPG)
As a final, finishing touch, wire a Swarovski crystal flower button to the center of the hairpin. This conveniently masks the unsightly wire bits. The crystal button used here is item #60441, but Swarovski makes many different crystal button styles, and you can choose whichever one you like best, of course. The button could also be glued in place, if you prefer.
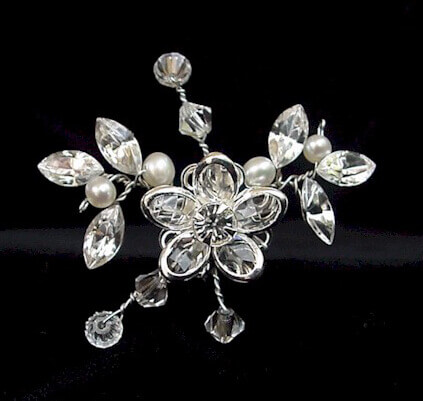
Elegant and delicate, but with a ton of sparkle, the Carin Hairpin is an extremely versatile wedding accessory. Cluster a few of them together to create the look of a tiara or backpiece. Or scatter them through your hair, or mix with the Danielle hairpins. Add some color by using some of the rainbow of colors produced by Swarovski (Prom! Flowergirl! Bride bored of all white!) Or use these techniques to create other, more elaborate designs. It's easy to create a gorgeous, real pearl and Swarovski crystal heirloom for your wedding. And at a fraction of the cost of buying it.
I'll be doing a post with links to all my favorite suppliers and vendors soon!

.png)